I've been shamelessly scalping the AUDJPY this week (via Oanda). It may be hard to fathom, at least when you see the numbers, but I'm not entirely happy with my results.Jun 28: 00.28% NAV+Jun 29: 06.65% NAV+Jun 30: 11.66% NAV+So far this week, if I can hang onto it, I'm up over 19% on my trading account.Now, you may be wondering why I'm not satisfied with my trading. Basically, I've made too
29 Jun 2009
26 Jun 2009
Well, it's been a while since I posted. Things have been hectic, but I did just take a short vacation. No running water. No cell phones. No internet. No trading. There were, however, lakes and fish.I think I'm ready to do some serious speculation at this point... as long as the market behaves.Hopefully I'll soon be posting and tweeting up a storm!We'll see.
9 Jun 2009
Here is the list of the Forex trading brokers with the favorable trading conditions and a decent reputation among the currency market participants. If you prefer flexible Forex trading conditions with little bureaucratic procedures, then these brokers are recommended for you:
FXOpen — one of the most popular MetaTrader Forex brokers with an easy entry limit and a really fast execution (they constantly invest into new trading servers):
InstaForex — known for their aggressive bonus and competition promotions, this broker offers extremely flexible leverage and has a very dedicated support:
FXcast — Forex broker that is famous for its multi-national and multi-lingual team with a support available in almost any language spoken:
Forex4you — ultimate decision for small-scale traders. With Forex4you you can trade even with cents:
FXOpen — one of the most popular MetaTrader Forex brokers with an easy entry limit and a really fast execution (they constantly invest into new trading servers):
- Welcome bonus system
- $1 to start trading
- WebMoney, LibertyReserve, CashU, E-Bullion and other payment options
- Traders’ contests with real bonuses
- 1-2 pips spreads on majors
InstaForex — known for their aggressive bonus and competition promotions, this broker offers extremely flexible leverage and has a very dedicated support:
- MetaTrader trading platform
- Flexible leverage — from 1:1 to 1:1000
- WebMoney, Moneybookers, e-Bullion and other payment methods
- Starter’s bonus — from $30
- Open account with only $1
FXcast — Forex broker that is famous for its multi-national and multi-lingual team with a support available in almost any language spoken:
- MT4 trading platform
- Leverage up to 1:400
- No slippage during high volatility periods
- Start trading with $10
- WebMoney, c-gold, LibertyReserve, StrictPay and many other e-currencies
Forex4you — ultimate decision for small-scale traders. With Forex4you you can trade even with cents:
- Deposit with WebMoney, LibertyReserve and other ways
- Ultra-micro lots — 0.0001 of a standard lot
- MetaTrader platform for trading
- Get paid an interest on your account balance
8 Jun 2009
Trading with the chart patterns can be easy if you know how to distinguish them and how to place the entry and exit orders correctly. There are many different chart patterns recognized by the expert financial traders. But in my opinion, in Forex trading there are five most important and rather frequently appearing patterns: ascending, descending and symmetrical triangles and rising and falling wedges. Here you will find the models of these patterns and their descriptions:
Ascending Triangle
Generally, it’s a bullish continuation pattern but the breakout in each direction is possible. If you like taking risk you can go long immediately after you spot this pattern. But if you want to be careful it’s recommended to wait until breakout appears in either side. The most important parts of the ascending triangle are the horizontal line and the upwardly sloping line. It’s also important for the price rate to touch each of those lines at least twice before breakout. This rule is vital for all of the 5 Forex chart patterns presented in this article. As you can see on the image, the price has touched the sloping line three times and the horizontal line two times and then broke out through the latter. Stop-loss should be placed slightly below the horizontal line. As the moderate pull-back is possible, consider placing stop loss near 70% level on the way from the sloping line to the horizontal one in place of the breakout. Take-profit should be placed according to the auxiliary sloping line, which runs from triangle’s top-left angle parallel to the main sloping line. Consider placing your target at the auxiliary line’s level in place of the breakout.

Descending Triangle
Generally, it’s a bearish continuation pattern but the breakout in each direction is possible. As with the previous pattern you can go short immediately after you spot it. Wait for breakout in either side to enter a high-probability position. The most important parts of the descending triangle are the horizontal line and the downwardly sloping line. The price rate should touch each of those lines at least twice before breakout. As the image shows, the price has touched the sloping line three times and the horizontal line two times and then broke out down. Stop-loss and take-profit levels are placed using the same principles as with the ascending triangle.

Symmetrical Triangle
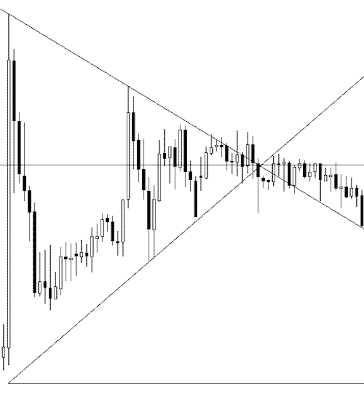
Generally, it’s a continuation pattern that breaks out in the direction of the previous trend, but in practice breakout in every direction is possible. As always, you may decide to open a position in the direction of the previous trend immediately as you spot this triangle. If you wait for breakout then you have better chances of success. The most important parts of the symmetrical triangle are the downwardly and upwardly sloping lines and the horizontal line that bisects the angle created by the first two lines. The last line should be really horizontal (several degrees of error are allowable) or otherwise it’s some kind of a wedge but not a symmetrical triangle. As always, the price should touch each of the main sloping lines at least twice before breakout. Symmetrical triangle, which is shown on the image, breaks out downwardly after touching the bottom line three times and the top line multiple times. Stop-loss should be placed near 70% level on the way from the opposite sloping line to the horizontal line in the basement of the triangle (not the breakout point like before). Take-profit can be set near the auxiliary horizontal line, which runs from the top or bottom base angle (depends on the breakout direction) of the triangle and is parallel to the main horizontal line.
Rising Wedge
Usually, this chart pattern signals a reversal from the previous trend, but both upward and downward breakouts are possible. You can enter a risky trade immediately when you see this pattern. Wait for a clear breakout to enter a more probable trade. The crucial parts of the rising wedge are the two upwardly sloped lines that form a wedge. The price should touch each of them at least twice before breakout. On the image below you can see that the price touched top line two times and the bottom line multiple times. The downward breakout is shown. Stop-loss can be set at the auxiliary line that bisects the angle of wedge; set it near the level of the auxiliary line at the breakout. Take-profit is set near the auxiliary line (not shown on the image) that runs from the top or bottom base angle (depending on the breakout direction) of the wedge and is parallel to the opposite sloping line. E.g. in the picture’s example wedge the line should start at the bottom angle of the wedge and be parallel to the top sloping line. Take-profit should be placed near the level of that auxiliary line at breakout.

Falling Wedge
As its rising cousin, this chart pattern often signals a reversal from the previous trend, but both upward and downward breakouts are still possible. To enter a risky trade, open it immediately as you see this chart pattern. Wait for a clear breakout to enter a more probable trade. The main parts of the falling wedge are two downwardly sloped lines that form a wedge. The price should touch each of them at least twice before breakout. On the image you can see that the price touched the bottom line two times and the top line multiple times. Upward breakout is shown. Stop-loss and take-profit levels are set using the same principles as with the rising wedge.

If you have your own opinion or questions about Forex chart patterns, feel free to leave it in a comment to this post.
Ascending Triangle
Generally, it’s a bullish continuation pattern but the breakout in each direction is possible. If you like taking risk you can go long immediately after you spot this pattern. But if you want to be careful it’s recommended to wait until breakout appears in either side. The most important parts of the ascending triangle are the horizontal line and the upwardly sloping line. It’s also important for the price rate to touch each of those lines at least twice before breakout. This rule is vital for all of the 5 Forex chart patterns presented in this article. As you can see on the image, the price has touched the sloping line three times and the horizontal line two times and then broke out through the latter. Stop-loss should be placed slightly below the horizontal line. As the moderate pull-back is possible, consider placing stop loss near 70% level on the way from the sloping line to the horizontal one in place of the breakout. Take-profit should be placed according to the auxiliary sloping line, which runs from triangle’s top-left angle parallel to the main sloping line. Consider placing your target at the auxiliary line’s level in place of the breakout.

Descending Triangle
Generally, it’s a bearish continuation pattern but the breakout in each direction is possible. As with the previous pattern you can go short immediately after you spot it. Wait for breakout in either side to enter a high-probability position. The most important parts of the descending triangle are the horizontal line and the downwardly sloping line. The price rate should touch each of those lines at least twice before breakout. As the image shows, the price has touched the sloping line three times and the horizontal line two times and then broke out down. Stop-loss and take-profit levels are placed using the same principles as with the ascending triangle.

Symmetrical Triangle
Generally, it’s a continuation pattern that breaks out in the direction of the previous trend, but in practice breakout in every direction is possible. As always, you may decide to open a position in the direction of the previous trend immediately as you spot this triangle. If you wait for breakout then you have better chances of success. The most important parts of the symmetrical triangle are the downwardly and upwardly sloping lines and the horizontal line that bisects the angle created by the first two lines. The last line should be really horizontal (several degrees of error are allowable) or otherwise it’s some kind of a wedge but not a symmetrical triangle. As always, the price should touch each of the main sloping lines at least twice before breakout. Symmetrical triangle, which is shown on the image, breaks out downwardly after touching the bottom line three times and the top line multiple times. Stop-loss should be placed near 70% level on the way from the opposite sloping line to the horizontal line in the basement of the triangle (not the breakout point like before). Take-profit can be set near the auxiliary horizontal line, which runs from the top or bottom base angle (depends on the breakout direction) of the triangle and is parallel to the main horizontal line.

Rising Wedge
Usually, this chart pattern signals a reversal from the previous trend, but both upward and downward breakouts are possible. You can enter a risky trade immediately when you see this pattern. Wait for a clear breakout to enter a more probable trade. The crucial parts of the rising wedge are the two upwardly sloped lines that form a wedge. The price should touch each of them at least twice before breakout. On the image below you can see that the price touched top line two times and the bottom line multiple times. The downward breakout is shown. Stop-loss can be set at the auxiliary line that bisects the angle of wedge; set it near the level of the auxiliary line at the breakout. Take-profit is set near the auxiliary line (not shown on the image) that runs from the top or bottom base angle (depending on the breakout direction) of the wedge and is parallel to the opposite sloping line. E.g. in the picture’s example wedge the line should start at the bottom angle of the wedge and be parallel to the top sloping line. Take-profit should be placed near the level of that auxiliary line at breakout.

Falling Wedge
As its rising cousin, this chart pattern often signals a reversal from the previous trend, but both upward and downward breakouts are still possible. To enter a risky trade, open it immediately as you see this chart pattern. Wait for a clear breakout to enter a more probable trade. The main parts of the falling wedge are two downwardly sloped lines that form a wedge. The price should touch each of them at least twice before breakout. On the image you can see that the price touched the bottom line two times and the top line multiple times. Upward breakout is shown. Stop-loss and take-profit levels are set using the same principles as with the rising wedge.

If you have your own opinion or questions about Forex chart patterns, feel free to leave it in a comment to this post.
28 Mei 2009
While reading a recent CNBC article about current events something clicked for me.Here is the passage:The dollar rose broadly on Thursday as yields on 10-year U.S. government bonds jumped more than 50 basis points in the last two weeks, drawing Japanese investors into overseas assets like global semi-conductor stocks, banks and U.S. junk bonds, according to Reuters.Do you remember the massive
Have you been following people involved in fx trading on twitter?Have you noticed how many people are happy to tell you what happened? While macroeconomic news and previous day post analysis can be useful, it certainly doesn't help you make a trading decision based on current charts. I have a little proposal to make.Instead of tweeting that you've opened a long or short position provide some
Langganan:
Postingan (Atom)


